API Implementation Guide
This guide aims at giving context to developers interested in integrating the AutoRetouch API into their applications.
This guide does not replace the API documentation; the latter remains the source of truth and contains the necessary details to integrate, but this guide provides a more opinionated view that can help you get started.
This guide should only be used to understand how the API works. API users are responsible for their final implementation and should adopt industry best practices (e.g., retry mechanisms, error handling, security) before performing API calls.
Requirements
Section titled “Requirements”You will need the following:
- An AutoRetouch user account. Need an account or want to try AutoRetouch? Contact Sales.
- This user must have access to the organization you’d like to use via the API.
- For the purpose of testing, we recommend to request the creation of a dedicated workflow with a single ‘export’ workflow component; that way you’ll minimize wait time during your implementation, and costs. To do that, reach out to the Support team.
Target implementation
Section titled “Target implementation”This guide will focus on how to integrate the API for the purpose of sending images to a specific workflow and getting them back. There are other actions we can perform via the API, but that’s the main use case!
In a nutshell, this is what we’ll do:

Step-by-step
Section titled “Step-by-step”1. Authorize your API client
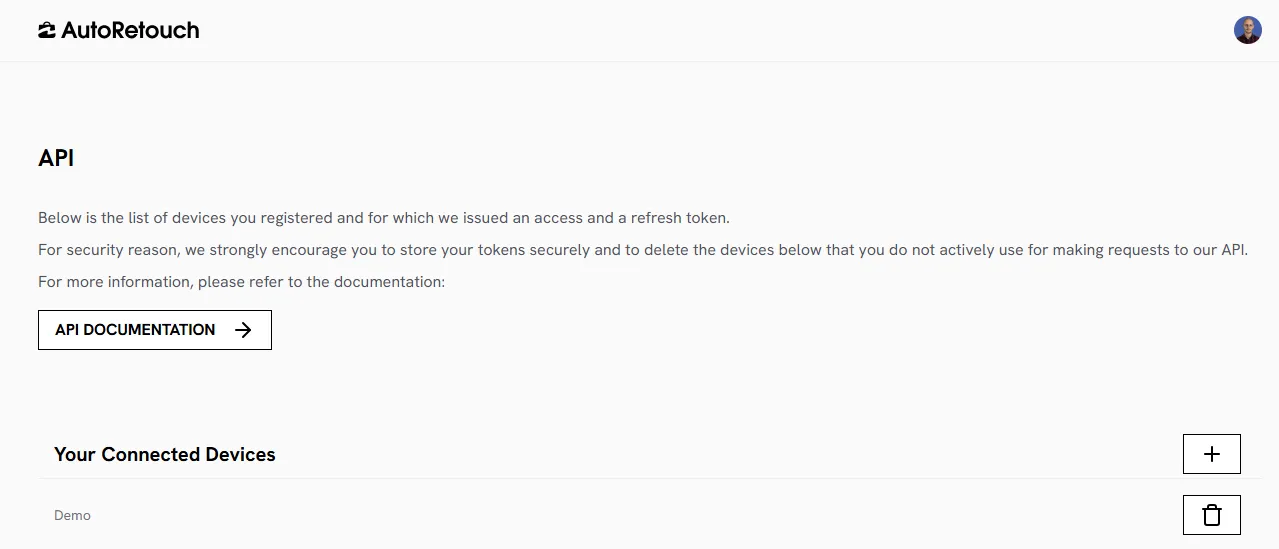
Section titled “1. Authorize your API client”For this, you will need to go to the API credentials page (also accessible via your profile menu).
- Login with your AutoRetouch credentials at https://webapp.autoretouch.com
- You should land to the home page
- Click on your profile menu, top-right corner
- Select “API” to open the screen shown above
Once you’re on your profile:
Section titled “Once you’re on your profile:”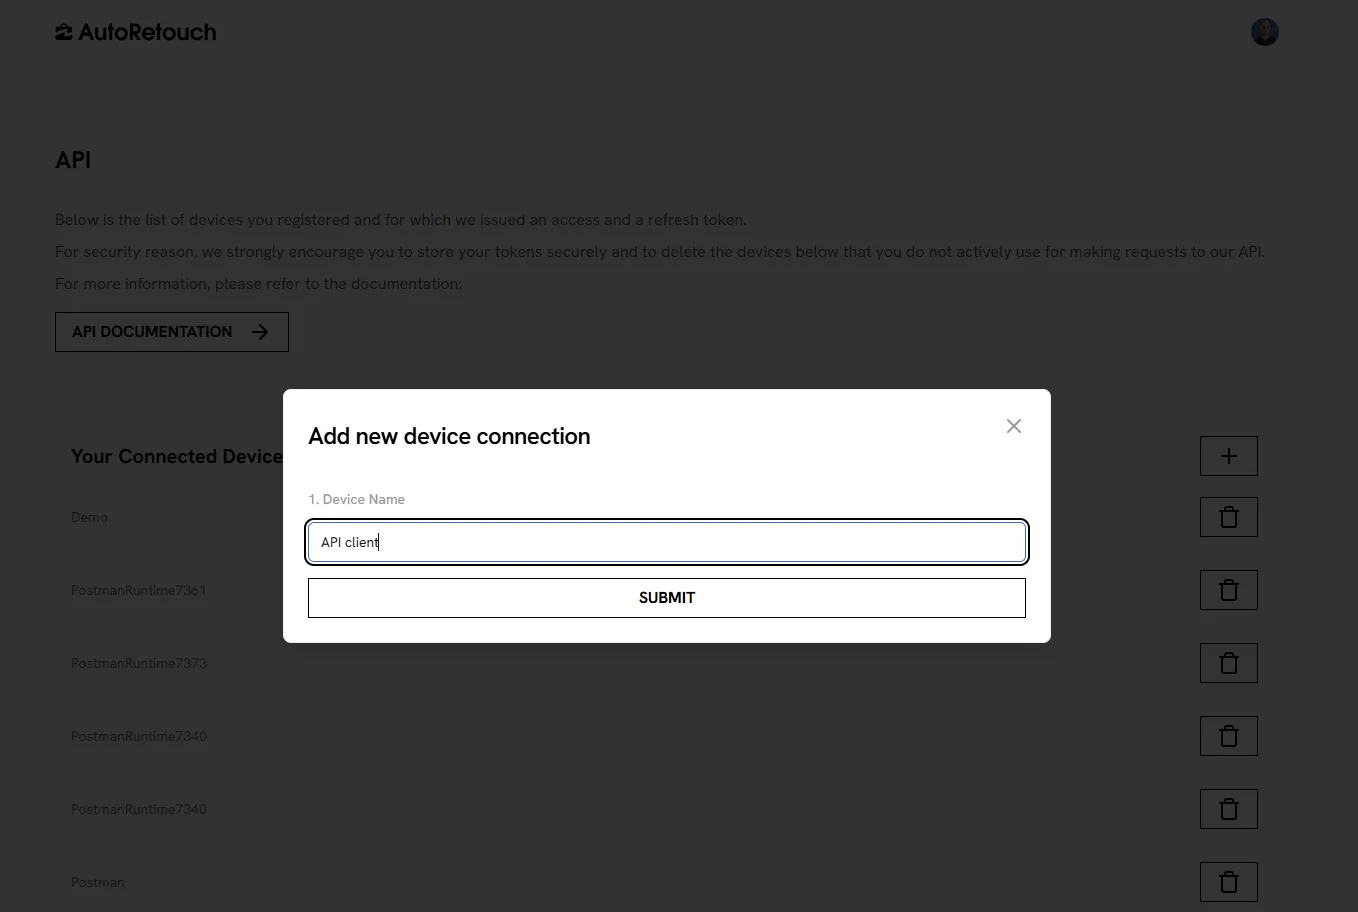
- Click on the “plus” button to add a device
- Enter a device name (e.g., Test Client)
- Submit, then click “Confirm Device”. This will trigger a device authorization flow (opened in a new window)
Once the window loads:
Section titled “Once the window loads:”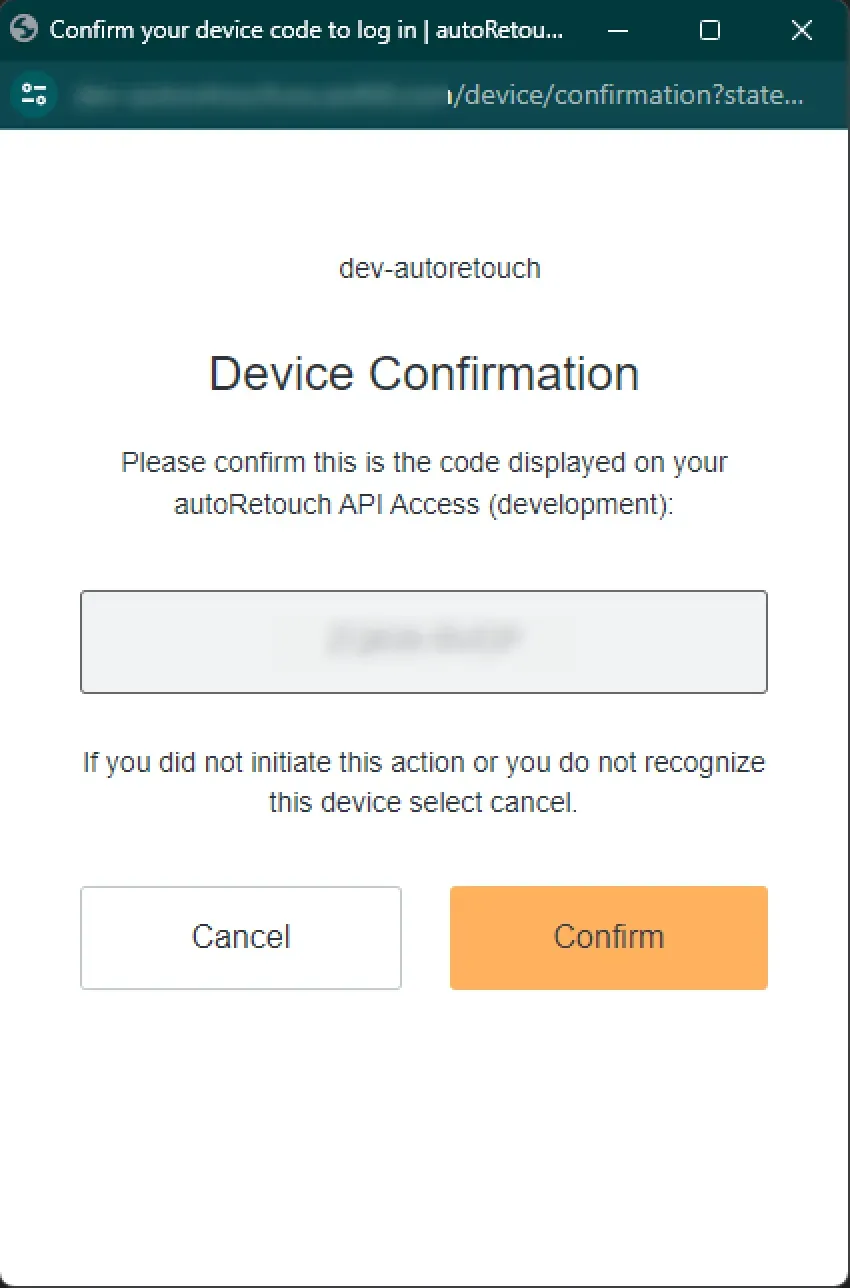
- If the verification code on your profile matches the one in the new window, click “Confirm”
- You may have to log in at this step; use your AutoRetouch credentials for that.
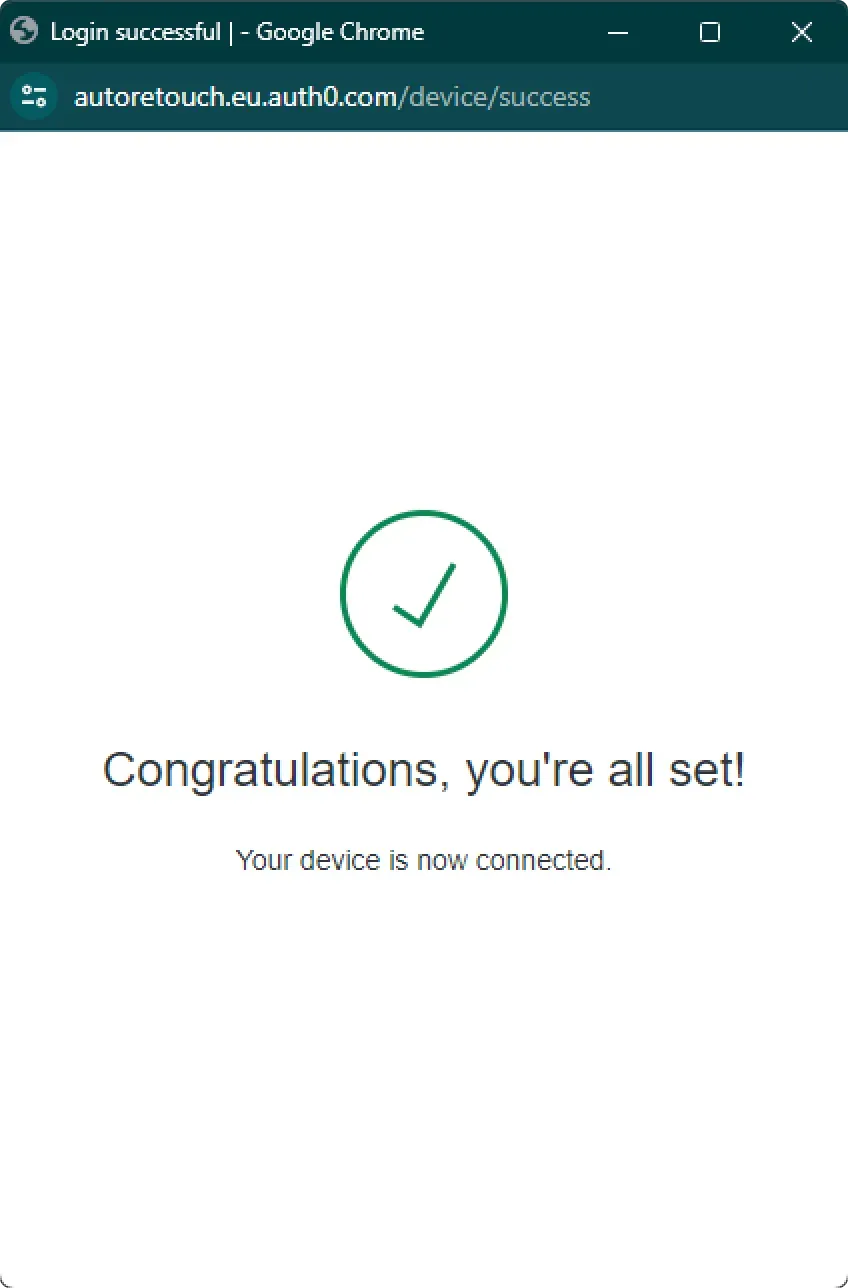
If all goes well, you will see a “Congratulations, you’re all set” message:
On your profile, you should see the following:
Section titled “On your profile, you should see the following:”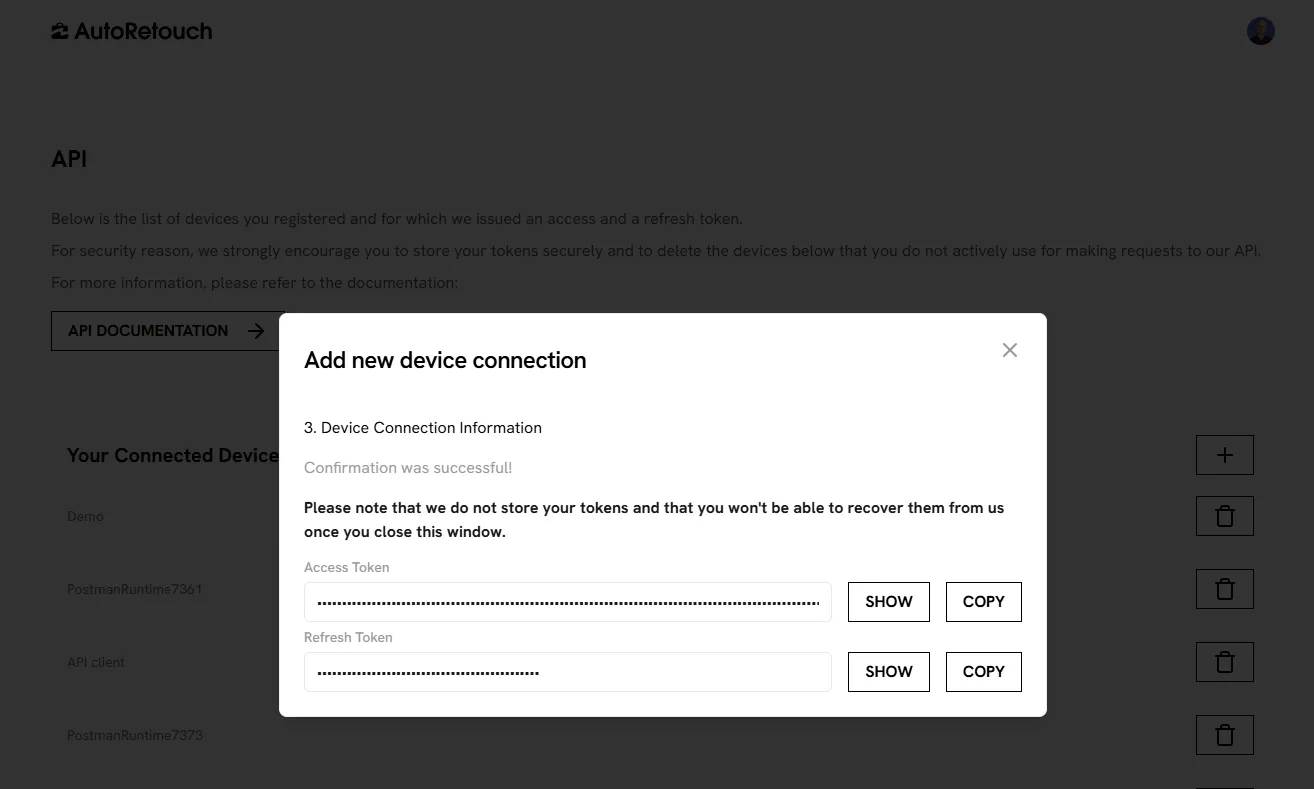
- You will be able to see and copy the refresh token. We are not interested in the access token here, as we’ll rely on the refresh token to obtain access tokens when needed via the API.
- Once the refresh token is saved securely on your end, you can close the “Add new device connection” window. This is shown only once, so make sure to store this information securely before closing the window.
2. Get an access token
Section titled “2. Get an access token”Now that you have obtained a refresh_token, all you have is to obtain
an access_token using the refresh access
token endpoint (API doc).
The key information is to understand that the
client_id is a static and global value.
You should use the one provided in the documentation.
Once you’re done, validate that your access token works by calling the
/v1/organization endpoint. You should see
details about your organization, including its name and ID. You can take note
of the organization_id you’d like to use
for this implementation if you don’t have it already, as you will need it for
your implementation.
3. Upload an image
Section titled “3. Upload an image”- Perform an image upload using the dedicated upload endpoint (API doc)
- You will get an image hash back in the response, which you have to keep/store for the next step
Note that uploading in parallel is a true time saver for high-volume processing.
4. Create a workflow execution
Section titled “4. Create a workflow execution”A workflow execution means telling the system to process an image through a workflow. There are quite a few important points to know to make the most of the workflow execution creation endpoint (API doc).
Webhooks
Section titled “Webhooks”You can pass a webhook URL when creating a workflow execution. This webhook URL
will be invoked by the API when the execution has specific statuses like
IN_QA or COMPLETED. The alternative is to poll the
workflow execution details endpoint, but this is less efficient.
The response in both cases is the one you get when performing a
GET on workflow execution details (API doc),
but when it’s delivered via Webhook, the response body is wrapped in a content
object as shown below:
{ "event": "WORKFLOW_EXECUTION_COMPLETED", "content": { "id": "4f49c2b1-b428-44d2-8035-6949982122ce", "workflow": "6afcab7d-da51-4dd1-847a-3c1ccd39cd68", "workflowVersion": "74c0097a-0732-4539-92f1-c0b3d34e6769", "workflowName": "", "organizationId": "9451ecbf-79db-4013-98b1-2c300748b170", "status": "COMPLETED", "userId": "google-oauth2|118231812295695726244", "createdAt": "2025-05-28T20:33:16.193Z", "startedAt": "2025-05-28T20:33:16.738Z", "finishedAt": "2025-05-28T20:33:33.835Z", "inputFileName": "test.jpg", "inputContentHash": "df3b47d7c2f2d5bf0333ee086e31ff041d4aa85830290e6605e92d79341f9a54", "intermediateResult": null, "resultContentHash": "09ad3a37cdd83475c88f99b65ee64167933c93573d7df0326cca72ab4d155a70", "resultContentType": "image/png", "resultFileName": "test.png", "resultPreviewContentHash": "09ad3a37cdd83475c88f99b65ee64167933c93573d7df0326cca72ab4d155a70", "resultPath": "/image/09ad3a37cdd83475c88f99b65ee64167933c93573d7df0326cca72ab4d155a70/test.png", "labels": { "autoretouch_batch_name": "test", "autoretouch_batch_id": "29532657-c82b-427a-8b6a-ded598d696a8", "autoretouch_batch_createdAt": "2024-02-08T09:09:01.960Z" }, "chargedCredits": 57, "feedback": null, "fastlane": null, "webhooks": [ "https://webhook.site/xxx-xxx-xxx" ] }}Note that event names in webhooks events don’t match with statuses. To make sure
you only process completed executions, test for event == WORKFLOW_EXECUTION_COMPLETED.
Batching
Section titled “Batching”You can pass Batch information to the API, which is recommended if you plan to rely on quality checks down the line. If you don’t, you can skip this section.
Batching from the API standpoint corresponds to setting shared attributes between executions. There is no batch upload or batch processing occurring here, and there are no performance gains in providing batching information at the API level.
In the API, we use the term batch. In the AutoRetouch Web App, the same concept is shown to users as an order. When someone processes an order in the UI, a batch of executions is created under the hood. And if a developer uses the API to create a batch of executions, these executions will show up within an order in the UI. Make sure to align on this with teams using the Web App, so that the way you group executions makes sense from a business perspective.
Example
Section titled “Example”If you create 3 executions that have all the
autoretouch_batch_id set to
29532657-c82b-427a-8b6a-ded598d696a9, then
these executions will be interpreted by downstream systems, like the AutoRetouch
UI, as being part of the same batch.
How to group images
Section titled “How to group images”Usually, images are grouped logically. If you are an eCommerce site, you may want to group them by SKU. You can also group them arbitrarily, for instance, by group of 50.
Benefits
Section titled “Benefits”- The related images will show as belonging to the same batch in the AutoRetouch UI.
- The related images will be handled together when quality checks are performed.
- The batch information will be available to you in the execution details payload, allowing you to group images together should that be needed.
Example of request body
Section titled “Example of request body”Here is a workflow execution creation body that illustrates how to use the various features discussed in this section:
{ "image": { "contentType": "image/jpeg", "contentHash": "{{image_hash}}", // from your upload "name": "myfilename.jpg" }, "labels": { "autoretouch_batch_id": "29532657-c82b-427a-8b6a-ded598d696a9", // uuid "autoretouch_batch_name": "Boots 224", // string /** best time you can get to represent a batch creation time, the value is mandatory but if not perfect it will work. **/ "autoretouch_batch_createdAt": "2024-02-08T09:09:01.960Z" }, "webhooks":[ "<https://webhook.site/xxxx>" ]}5. Get the image resultPath
Section titled “5. Get the image resultPath”If you have successfully created your execution, you’ll get an execution id back.
- You can then use it to poll the workflow execution details endpoint (API doc)
until the
statusis set toCOMPLETED. When that’s the case, you will also have access to theresultPathof the image, which you will need to go to the next step. - Or, if you passed a webhook URL, just catch the
resultPathwhen your infrastructure receives the callback from AutoRetouch. The payload will contain the same information (workflowid,resultPath,status, etc.), just make sure to parse the event payload as explained in the section dedicated to webhooks.
6. Download the image
Section titled “6. Download the image”Regardless of your method to obtain the
resultPath, you can now download the workflow
execution result image using the dedicated endpoint (API doc).
You’re done 🎉